No, I didn't have enough time to finish the FlaK. I'll finish it next year, it made no sense to ruin the model by hurrying too much.
I continued painting the camo with the green and kept using the same stencils. The wheel hubs ended up being awesome - the rest didn't. Both the fenders and shield halves look more like mouldy bread than parts of a war machine.
Sigh.
Anyway, the idea works, I just have to improve the stencil so it works better with the pieces I want to paint. This "one masking piece works everywhere" doesn't work too well, apparently. It wasn't a horrible defeat, it just requires a bit more work. And not horribly much of that, after all, just some modifications. If I remember, I'll post some proof next year.
Now completely off-topic for the whole blog: tomorrow we'll take a flight somewhere else and we'll see if the yule goat brings something nice for my hobby or if I have to go and get everything myself :) Eating well at those latitudes is a given, at least for someone like me who doesn't exaclty love the traditional foodstuffs.
May the next year be more active than this one - for each and every one of us 8)
21.12.10
16.12.10
First mottling attempt
Earlier this week I got this thought in my head that the air can that I started in the summer might not be that good anymore. So I took and changed it to the new one. And himmel, the new one shot air like a storm wind unlike the previous one that was closer to a lungless chainsmoker... If those cans run out that quick with my ways of working, a compressor might not be a bad idea at all. As long as they don't cost monkeys covered in chocolate.
The main thing is that now the model is nicely covered in Dunkelgelb and no basecoat is visible anywhere. *cough*

So I decided to take and attempt the "mottle camo" idea I was talking about the last time. I also happened to have a bunch of small cardboard pieces that were protecting the photo-etch pieces. They were a bit big for what I had thought, but then again, it's better be safe than sorry. Especially knowing how my experimentalism usually ends up.
Anyway, if that ends up looking even half-decent and keeps the rest of the model clean, I'll call it a victory. To begin with, I decided to start with the brown and maybe go for the green tomorrow when everything's nicely dry. Unless I have to go back and cover everything with dark yellow again. Judging by the stencil itself after use, maybe I should've adjusted the airbrush head to be a bit smaller, to avoid wasting that much paint:

The wheel hubs were the first victim of mine, they ended up looking pretty fine to me. Encouraged by this tiny victory, I turned my attention towards the shields and the fenders. They didn't end up looking as nice, but we'll see how it all goes when I've added the green as well:
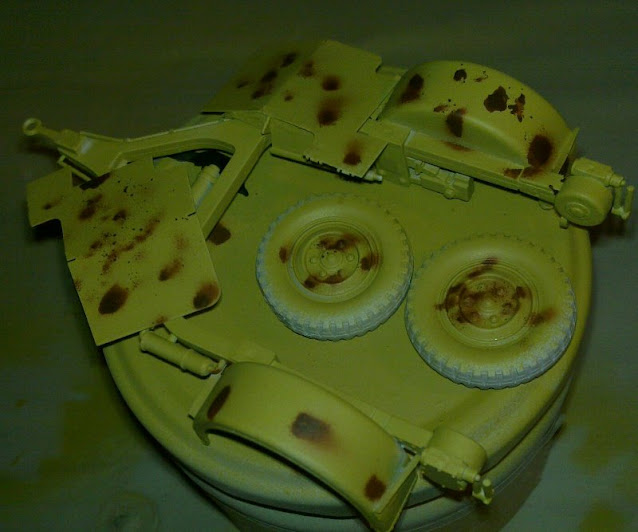 You can see some splashes and shit, some of the blots aren't quite what I was going for but then again, this was my first attempt and if you don't count the wheels in, all the pieces were a bit "funny" to paint by their shape / size. I believe this'll be a lot more doable with testing and developing (a couple of dozen iterations maybe?) and quite nice looking, too :)
To finish up my evening's painting session I took my paintbrush and started painting the gun's barrels back - again. I'm afraid I have to throw that brush away or redelegate it to weathering, because it's not useable for small details or finishing touches anymore. Oh, I had almost remembered to attach the armour pieces to the barrel-thingies that I forgot to use ages ago. You can see them in the photo, but for some reason I managed to take this pic from an angle that mostly hides one of the left side barrels.
But these aren't final pics but just stuff I take on the go to post here, so who cares at thise point? For that same reason I don't modify them more than just cropping and downscaling.
 As a nice end a photo of that damn gun from another angle, that traditionally shows that no, there's not enough paint inside the muzzles after all. How the hell does this always happen?

If I get to "finish" this model on the weekend, as I'm insanely half-expecting, good. Otherwise it's going to be finished next year.
How exciting!
The main thing is that now the model is nicely covered in Dunkelgelb and no basecoat is visible anywhere. *cough*

So I decided to take and attempt the "mottle camo" idea I was talking about the last time. I also happened to have a bunch of small cardboard pieces that were protecting the photo-etch pieces. They were a bit big for what I had thought, but then again, it's better be safe than sorry. Especially knowing how my experimentalism usually ends up.
Anyway, if that ends up looking even half-decent and keeps the rest of the model clean, I'll call it a victory. To begin with, I decided to start with the brown and maybe go for the green tomorrow when everything's nicely dry. Unless I have to go back and cover everything with dark yellow again. Judging by the stencil itself after use, maybe I should've adjusted the airbrush head to be a bit smaller, to avoid wasting that much paint:

The wheel hubs were the first victim of mine, they ended up looking pretty fine to me. Encouraged by this tiny victory, I turned my attention towards the shields and the fenders. They didn't end up looking as nice, but we'll see how it all goes when I've added the green as well:

To finish up my evening's painting session I took my paintbrush and started painting the gun's barrels back - again. I'm afraid I have to throw that brush away or redelegate it to weathering, because it's not useable for small details or finishing touches anymore. Oh, I had almost remembered to attach the armour pieces to the barrel-thingies that I forgot to use ages ago. You can see them in the photo, but for some reason I managed to take this pic from an angle that mostly hides one of the left side barrels.
But these aren't final pics but just stuff I take on the go to post here, so who cares at thise point? For that same reason I don't modify them more than just cropping and downscaling.


If I get to "finish" this model on the weekend, as I'm insanely half-expecting, good. Otherwise it's going to be finished next year.
How exciting!
10.12.10
Trickery of random quality and some painting at last
So I finally got the basecoating redone (as I had originally intended). Because it's so damn cold and dark in the balcony at this point, I decided that the kitchen is a really good place to paint with the airbrush. I mean, those Vallejo model air paints don't really smell, unlike that sprayable primer.
The first pic shows the gun right before re-basecoating. I had to do some trickery to get those photo-etch pieces stick. A trick that I had come up with with my OmniMech projects: my modeling glue and some white glue. If you use a thin layer of white glue on the other metallic piece and and some liquid glue on the other piece, they set very quickly when they get in contact. It's pretty handy with pieces like this that don't have much contact surface to begin with. And when the liquid glue either dries too quickly or way too slowly.
Maybe it looks a bit silly from a certain point of view, but who cares if I get the thing done so you can see at least something in the first place? :P
 First I had to clear some space on the desk, then dig up for all the junk like the canned air, my breathing mask and the painting box. Something was missing. That damn airbrush of course. Back to the storage room it was.
Luckily this apartment is so small that you can't really lose anything forever (sarcastic reference to my military passport, wherever the hell you are).
I had decided earlier, that the FlaK shall be mostly painted in dunkelgelb, with a couple of camo stripes on the shield halves, fenders and the wheel hubs. The biggest single parts, that is. When this dark yellow is fine enough after a couple of layers, I'll repaint the gun barrels black and then go for the camo.
Maybe I'll try to come up with a stencil of sorts to make a ridiculous attempt at a mottle camo, I saw that in FSM's rss feed, regarding the mottle camo on a Luftwaffe plane. I think it sounds cool and I should maybe try.
 The rest of the pieces:

The point is to make a stencil and keep it slightly off the model while you paint with the airbrush. This way you end up nice, soft edges to the camo. At least that's in theory and what the übergurus accomplish. I'm not a guru, as we've noticed quite a few times already...
And now that I think of it, I'm almost in a hurry already if I want to get this project finished this year! The last 1,5 weeks I'll be abroad and I guess that the last days before flying will be busy enough so I won't have that much time to waste with silly things like this. We'll see.
The first pic shows the gun right before re-basecoating. I had to do some trickery to get those photo-etch pieces stick. A trick that I had come up with with my OmniMech projects: my modeling glue and some white glue. If you use a thin layer of white glue on the other metallic piece and and some liquid glue on the other piece, they set very quickly when they get in contact. It's pretty handy with pieces like this that don't have much contact surface to begin with. And when the liquid glue either dries too quickly or way too slowly.
Maybe it looks a bit silly from a certain point of view, but who cares if I get the thing done so you can see at least something in the first place? :P

Luckily this apartment is so small that you can't really lose anything forever (sarcastic reference to my military passport, wherever the hell you are).
I had decided earlier, that the FlaK shall be mostly painted in dunkelgelb, with a couple of camo stripes on the shield halves, fenders and the wheel hubs. The biggest single parts, that is. When this dark yellow is fine enough after a couple of layers, I'll repaint the gun barrels black and then go for the camo.
Maybe I'll try to come up with a stencil of sorts to make a ridiculous attempt at a mottle camo, I saw that in FSM's rss feed, regarding the mottle camo on a Luftwaffe plane. I think it sounds cool and I should maybe try.


The point is to make a stencil and keep it slightly off the model while you paint with the airbrush. This way you end up nice, soft edges to the camo. At least that's in theory and what the übergurus accomplish. I'm not a guru, as we've noticed quite a few times already...
And now that I think of it, I'm almost in a hurry already if I want to get this project finished this year! The last 1,5 weeks I'll be abroad and I guess that the last days before flying will be busy enough so I won't have that much time to waste with silly things like this. We'll see.
5.12.10
Swearing and crawling ahead
That photo-etched shield has been a huge problem. Damnit. Maybe this can be salvaged somehow, but it doesn't look too bright at the moment.
To compensate for the slowness of the shield building, I started to work on the carriage. I haven't got too far with that, either, but at least I've got something done for real instead of regluing metal pieces back together after they've broken off for some stupid reason....
Photos? Haven't bothered taking them because the slowness annoyed me too much. I mean, "yay, I got four pieces built" doesn't really make cool pics. Maybe next week.
Subscribe to:
Posts (Atom)